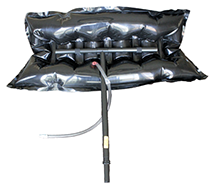
The Brick Model is for fireplaces with rectangular dampers, the maximum inflated size is 16" x 38". This model accordions to accommodate smaller fireboxes.
The Brick Model is the choice for most conventional wood burning fireplaces.

Assembly
Inflation
Damper Handle
Installing Fireplace Plug
Assembling your Fireplace Plug
Slide a wide tube into the tee device then through the elastic loops on the Fireplace Plug.
Slide the narrow tube into the remaining wide tube using the sliding lock to adjust height.
Slide the joined tubes into the tee and lock in place
when the fireplace Plug is at the correct height
under the damper.
Inflating your Fireplace Plug
The Fireplace Plug can be inflated by breathing air into the blue inflation valve on the clear inflation tube.
Twist the valve counter clockwise to open and clockwise to close.
When removing the Fireplace Plug release air through the valve until the seal is broken.
You can use battery powered or electric pump to inflate your Fireplace Plug but don't over inflate and only use air.

Brick Model Damper Handle
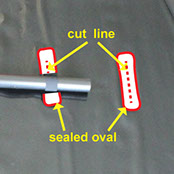
If your damper has a handle that interferes with installation of the Fireplace Plug try to remove or reposition the handles. If you can loosen the nut or cotter pin the handle can often be bent up and out of the way.If you cannot remove or reposition the damper handle try installing your Fireplace Plug against the handle and check to see if the area is sealed.If the Fireplace Plug does not seal there are 5 slit-able sealed sections where you can make a very small slit to pass the handle through. Lay the plug on a flat firm surface and cut a 1/2" slit along the sealed line that aligns with the damper handle with a sharp knife (dashed red line in photo)). Force the damper handle through the slit.Be very careful to cut along the line and do not to cut out side of the sealed oval(solid red line in photo).
.png?crc=439725957)
Installing your Fireplace Plug
Check firebox for any sharp jagged obstructions. If installation area is excessively dirty, clean with a brush or shop vacuum.
Attach the telescoping prop device to the Fireplace Plug. Partially inflate (about 6 breaths of air). Place the Plug in the Firebox in a V or U shape,(depending on which works best with your fireplace) usually, fitting the back first then flipping the front upward works best.
The inflation tube will be on the front side of the fireplace. Adjust the height of the "reminder stick" until the Fireplace Plug fits tight against the damper. Cut shorter if necessary. Check the perimeter of the Plug for a uniform seal & make necessary adjustments. Blow air through the blue inflation valve until the Plug makes a drum like sound when patted with your hand. Twist the valve clockwise to close. To remove the Fireplace Plug release a little air to break the seal and store in a large plastic bag until the fireplace is cool enough to reinstall.
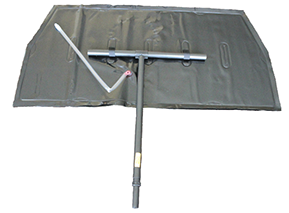
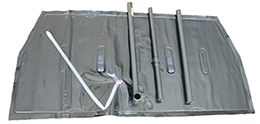
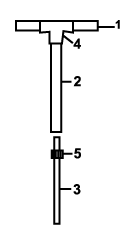
Brick Model Parts
Your Fireplace Plug kit includes:
1- R F welded 14 gauge proprietary black urethane
2- 2 x20" plastic tubes for assembling "the reminder stick"
1- 20 plastic tube for assembling "the reminder stick"
1- Plastic T fitting to assemble "the reminder stick"
1- Plastic slider locking wedge to set "reminder stick" height
1.
2.
3.
4.
5.
upper tube
lower tube
middle tube
tee
sliding lock
Slide 1 into 4, then through the outer
loops on the Fireplace Plug.
Slide 3 into 2 using 5 (sliding lock) to adjust the height.
Slide 2+3 piece into 4 (tee) and lock in place when the Fireplace Plug is at the correct height below the damper.
Reminder Stick Assembly
©Copyright 2013 All Rights Reserved. Fireplace Plug. For more information email info@fireplaceplug.ca